

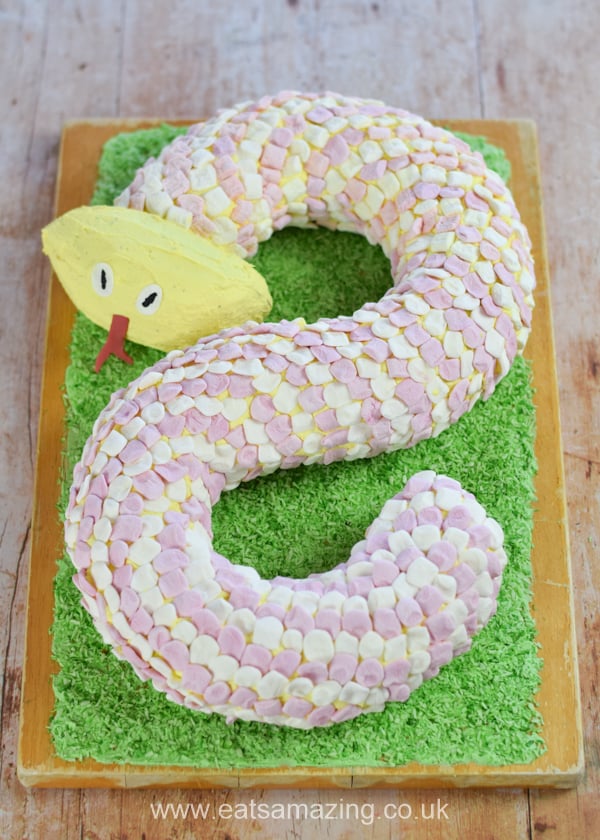
Impress friends & family by following this easy snake cake tutorial to make a showstopping cake that's perfect for birthday parties & Halloween!
Today I'm sharing how to make a snake cake, with recipe, step by step photos and full instructions for icing and decorating it. I'll be completely honest, this fun birthday cake is a bit time consuming but it's actually really easy to make and decorate, and is sure to wow everyone who sees it!
I made the snake cake for a birthday cake but I think it would be great for a Harry Potter themed party too or even for Halloween later in the year.

My younger son turned 5 last week, and I decided to resurrect one of my favourite family traditions from my childhood for the occasion. I'm one of seven children, and every year my amazing mum baked a cake for every single one of us on our birthday. The best thing of all though was that she let us choose our cake every year, selecting the design of our choice from a couple of cake books that she had.
No matter what we picked, she managed to pull it off every time and the cake was always a real highlight of our birthdays. I remember spending hours poring over the cake books with my siblings, planning what cakes we wanted when our birthday finally arrived!

My son obviously picked a snake cake for his birthday, from a Kids Birthday Cake book I've had for years. The cake in the book was a bit more complicated than the one I made in the end, so I decided to simplify it and put my own spin on it.
Inspiration for the marshmallow scales came straight from the book, although we couldn't find the rainbow ones they used here in the UK so ours ended up being a pink and white snake instead!
I made a classic marble cake for the inside of the snake, with chocolate cake by request and green coloured vanilla cake as a fun surprise! If you'd prefer just one flavour of cake, just leave out the cocoa powder and extra milk for vanilla, or double up the cocoa powder and extra milk to make it all chocolate. Adding the green colouring is totally optional as well, of course.
Because you need two cakes to get the right shape, this is a pretty big cake which will serve around 20 people.
Birthday Snake Cake
Ingredients (serves 20):
For the cake:
- 450g butter
- 400g golden caster sugar
- 8 eggs
- 450g self raising flour
- ½ tsp baking powder
- 100ml + 30ml milk
- 2 tsp vanilla extract
- green food colouring (optional)
- 45g cocoa powder
To decorate:
- 75g desiccated coconut
- green food colouring
- 300g butter
- 600g icing sugar
- 1 Tbsp vanilla extract
- yellow food colouring
- 300g mini marshmallows
- small piece red fondant icing
- edible marker pen
Equipment:
- 2 x 24cm savarin (ring) cake tins
- hand mixer/whisk
- large board
Method:
For the cake:
Start by making the cake. You'll need to make this in advance so that it has plenty of time to cool before icing.
Preheat your oven to 190°C (Gas mark 5/375°F). Grease the two savarin tins really well with butter or oil (I used spray oil to thoroughly coat mine).
In a large bowl, whisk together the butter and sugar. Add the eight eggs, two at a time, whisking after you add each pair.
Once the eggs have all been whisked in, add the flour, baking powder, 100ml of the milk and vanilla. Whisk again until fully combined.
Place half of the cake mixture in a separate bowl. Add green food colouring to this bowl and whisk, just until the cake mixture is evenly coloured.
Add cocoa powder and the remaining 30ml milk to the other bowl. Whisk until fully combined.
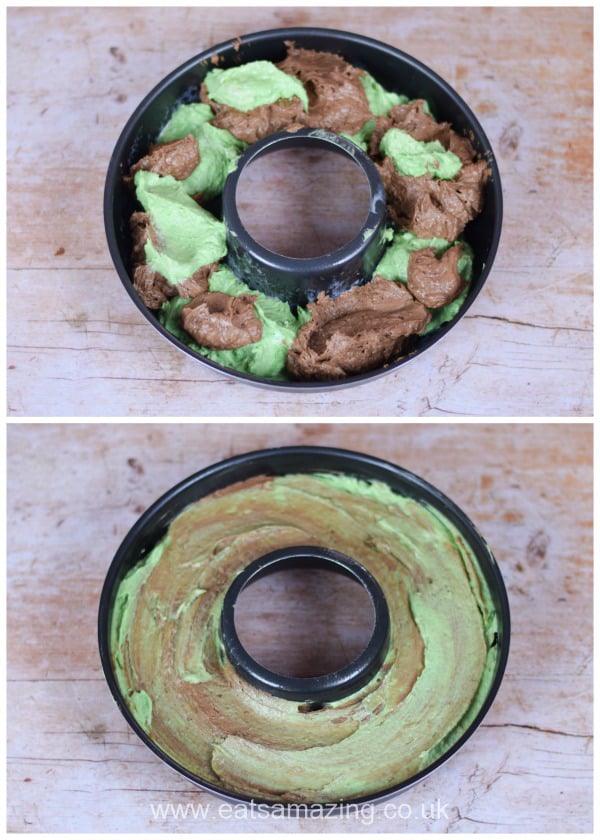
Using two spoons, divide the cake mixture between the two greased tins, dropping alternate spoonfuls of each flavour into each tin. Once all of the mixture is in the tins, swirl around each tin a couple of times with a skewer to give a marbled effect.
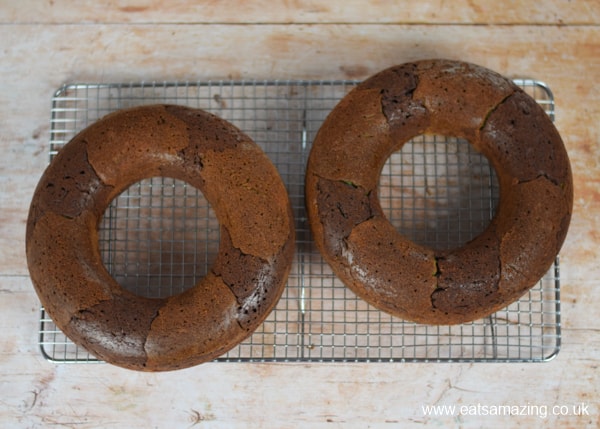
Gently smooth the tops down with a spatula, then pop both cakes in the oven and bake for around 30 minutes.
Check that the cakes are cooked by pushing a skewer into the thickest part of the cake - once cooked the skewer should come out clean when removed from the cake. You may need a bit more or a bit less time depending on your oven.
Once the cakes are cooked, remove from the oven and leave in the pans for ½ hour to cool. This will help you to remove the cakes without sticking. After ½ hour, run a knife around the edge of each cake, then carefully tip each cake out onto a cooling rack. They should just pop straight out.
Leave to cool completely before icing.
To decorate:
While the cake is cooking, prepare the coconut 'grass'. Place 75g desiccated coconut in a bowl and add green food colouring. If you use gel colouring, you may need to add a little water to help it coat the coconut. Stir well until all of the coconut is coloured, then tip out onto a tray or plate and leave to dry.

Also while the cake is cooking, prepare the marshmallow 'scales'. First separate the marshmallows into colours and then roll them flat. I found that the quickest way to do this is to place the marshmallows in lines on your work surface and roll them flat with a rolling pin, one line at a time.
If you don't put them in lines and just try to roll them at random, you'll run the risk of them all sticking together! Collect all of the flat marshmallow scales in two small bowls and cover until ready to use.

Once the cake is completely cool, make the butter icing.
Whisk 300g butter until soft and fluffy. Add the icing sugar, a little at a time, whisking as you go until completely combined. Add the vanilla extract and whisk again until combined.
Take 150g of the icing and pop it into a separate bowl. Add green food colouring and stir in to evenly colour this smaller amount of icing.
Add yellow food colouring to the remaining icing and whisk until evenly coloured.
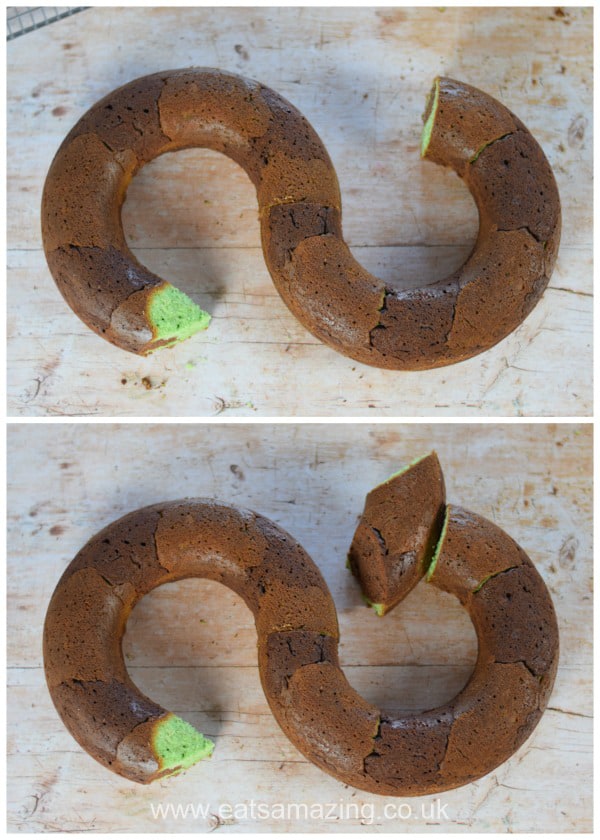
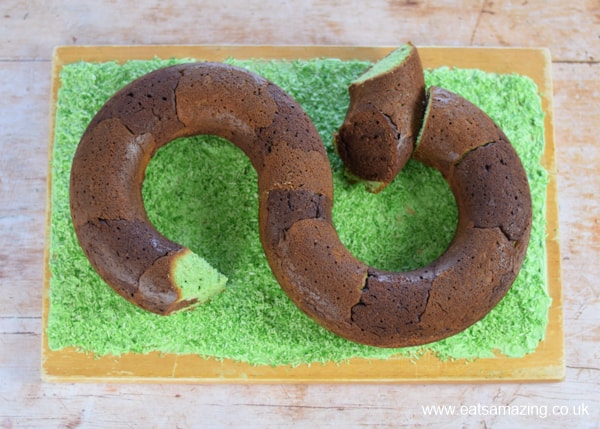
Cut the cakes up as shown below, removing a quarter from each cake, one at a sharp angle for the tail.

Shape the tail into a triangle by cutting away a slice from the other side, then shape one of the discarded cake quarters into a head.
Put the two cakes together to form an S shape (mine was a backwards S) and check that the whole cake will fit on the board you want to use.
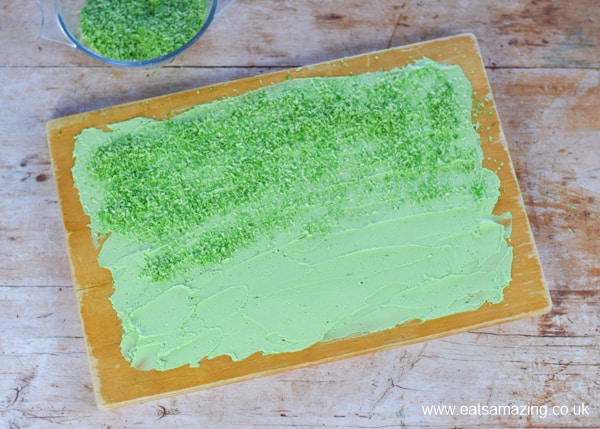
Spread the green butter icing over the board in an even layer and sprinkle with the green coconut for grass.
Place the cake on top of this base layer.
Starting from the tail end, spread buttercream over cake. I did mine in small sections so that the buttercream didn't dry out whilst I was adding the scales.

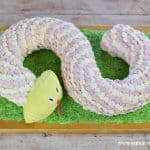
Once you have covered the first section in buttercream, start adding the marshmallow scales. Starting at the base of the tail, push the flattened marshmallows into the buttercream, alternating the colours in overlapping rows.

Follow the shape of the cake as you go around, you'll find the rows will sometimes curve in different directions as you go around the corners!

Continue to add buttercream and scales to the cake until the body of the snake is completely covered.
Cover the head cake piece in buttercream and attach it to the rest of the body.
Make the features; roll 2 white mini marshmallows flat and cut into ovals for the eyes, draw on the pupils with an edible marker pen (or paint them on with food colouring if you don't have one) and roll out a small piece of red fondant, cutting it into a tongue shape.
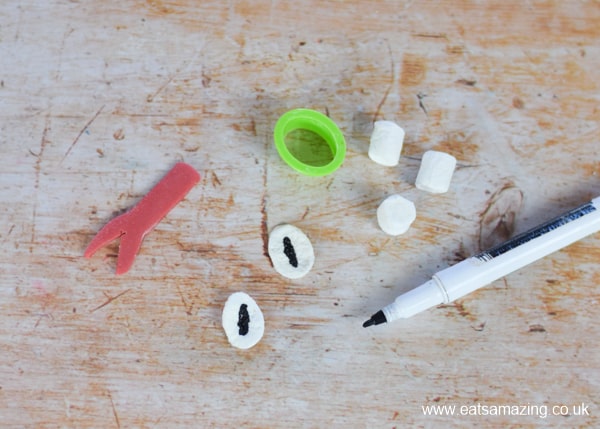
Attach the eyes and tongue to the head, pushing them gently into the buttercream to hold them in place.

Serve, and enjoy your scaly snake cake achievement!

If you enjoyed this cake recipe, you might also like these fun and easy cake ideas:


Or check out the cakes and cupcakes for kids section here on the blog for all of our fun cake recipes and easy cake decorating ideas!
Grace
This post contains some Amazon affiliate links; I may receive commission on items purchased through the links.
Birthday Snake Cake
Ingredients
For the cake:
- 450 g butter
- 400 g golden caster sugar
- 8 eggs
- 450 g self raising flour
- ½ tsp baking powder
- 130 ml milk
- 2 tsp vanilla extract
- green food colouring (optional)
- 45 g cocoa powder
To decorate:
- 75 g desiccated coconut
- green food colouring
- 300 g butter
- 600 g icing sugar
- 1 Tbsp vanilla extract
- yellow food colouring
- 300 g mini marshmallows
- small piece red fondant icing
- edible marker pen
Instructions
For the cake:
- Start by making the cake. You'll need to make this in advance so that it has plenty of time to cool before icing.
- Preheat your oven to 190°C (Gas mark 5/375°F). Grease the two savarin tins really well with butter or oil (I used spray oil to thoroughly coat mine).
- In a large bowl, whisk together the butter and sugar. Add the eight eggs, two at a time, whisking after you add each pair.
- Once the eggs have all been whisked in, add the flour, baking powder, 100ml of the milk and vanilla. Whisk again until fully combined.
- Place half of the cake mixture in a separate bowl. Add green food colouring to this bowl and whisk, just until the cake mixture is evenly coloured.
- Add cocoa powder and the remaining 30ml milk to the other bowl. Whisk until fully combined.
- Using two spoons, divide the cake mixture between the two greased tins, dropping alternate spoonfuls of each flavour into each tin. Once all of the mixture is in the tins, swirl around each tin a couple of times with a skewer to give a marbled effect.
- Gently smooth the tops down with a spatula, then pop both cakes in the oven and bake for around 30 minutes.
- Check that the cakes are cooked by pushing a skewer into the thickest part of the cake - once cooked the skewer should come out clean when removed from the cake. You may need a bit more or a bit less time depending on your oven.
- Once the cakes are cooked, remove from the oven and leave in the pans for ½ hour to cool. This will help you to remove the cakes without sticking. After ½ hour, run a knife around the edge of each cake, then carefully tip each cake out onto a cooling rack. It should just pop straight out.
- Leave to cool completely before icing.
To decorate:
- While the cake is cooking, prepare the coconut 'grass'. Place 75g desiccated coconut in a bowl and add green food colouring. If you use gel colouring, you may need to add a little water to help it coat the coconut. Stir well until all of the coconut is coloured, then tip out onto a tray or plate and leave to dry.
- Also while the cake is cooking, prepare the marshmallow 'scales'. First separate the marshmallows into colours and then roll them flat. I found that the quickest way to do this is to place the marshmallows in lines on your work surface and roll them flat with a rolling pin, one line at a time. If you don't put them in lines and just try to roll them at random, you'll run the risk of them all sticking together! Collect all of the flat marshmallow scales in two small bowls and cover until ready to use.
- Once the cake is completely cool, make the butter icing. Whisk 300g butter until soft and fluffy. Add the icing sugar, a little at a time, whisking as you go until completely combined. Add the vanilla extract and whisk again until combined.
- Take 150g of the icing and pop it into a separate bowl. Add green food colouring and stir in to evenly colour this smaller amount of icing. Add yellow food colouring to the remaining icing and whisk until evenly coloured.
- Cut a quarter circle from each cake, removing one at a sharp angle for the tail (see blog post images for details)
- Shape the tail into a triangle by cutting away a slice from the other side, then shape one of the discarded cake quarters into a head.
- Put the two cakes together to form an S shape (mine was a backwards S) and check that the whole cake will fit on the board you want to use.
- Spread the green butter icing over the board in an even layer and sprinkle with the green coconut for grass. Place the cake on top of this base layer.
- Starting from the tail end, spread buttercream over cake. I did mine in small sections so that the buttercream didn't dry out in between.
- Once you have covered the first section in buttercream, start adding the scales. Starting at the base of the tail, push the flattened marshmallows into the buttercream, alternating the colours in overlapping rows.
- Follow the shape of the cake as you go around, you'll find the rows will sometimes curve in different directions as you go around the corners!
- Continue to add buttercream and scales to the cake until the body of the snake is completely covered. Cover the head cake piece in buttercream and attach it to the rest of the body.
- Make the features; roll 2 white mini marshmallows flat and cut into ovals for the eyes, draw on the pupils with an edible marker pen (or paint them on with food colouring if you don't have one) and roll out a small piece of red fondant, cutting it into a tongue shape.
- Attach the features to the head, pushing them gently into the buttercream to hold them in place.
Notes
Love this fun cake? Why not save this post to Pinterest so you can easily find it again!

rekha says
awesome and simple
Grace Hall says
Thank you, glad you like it!
Meghan says
Hi There,
Could I make this cake with store bought cake mix?
Grace Hall says
Hi Meghan, absolutely, I'm not sure of the quantities as it depends on brand and the size of your pans, but I expect two or three packs would work for this. Hope that helps!
Pete says
450g seems an awful lot of butter - is this correct or a typo?
Grace Hall says
Hi Pete, that is the correct amount of butter - it's a very large cake, well two cakes really. You'll see that the butter is in proportion to the rest of the cake ingredients. Hope that helps!